IN CONCLUSION - SOME BROADER OBSERVATIONS ABOUT THIS ISLE OF MAN MOUNTAIN COURSE
COURSE DESIGN OBJECTIVE - REALISM FOR CHALLENGE AND ULTIMATE SATISFACTION
I hope you enjoy my version of THE ISLE OF MAN MOUNTAIN COURSE, home of the annual MANX TT and MANX GP bike races since 1911. I have certainly enjoyed the challenge of researching, constructing and driving it.
In my view, this MOUNTAIN COURSE is not really suited to those who wish to download a new track to try for just a few quick hard laps or for 10 minutes at a time. I think anyone who approaches it that way will be completely frustrated. I expect that some people will dislike the Course for that reason, however I couldnt bring myself to weaken the Course by producing artificial run off areas, just to make it easier for that type of driver.
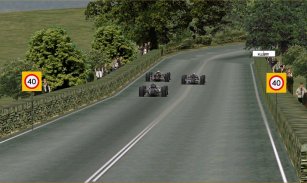
I sought rather to provide for those who, like me, will enjoy the most REALISTIC DRIVING CHALLENGE I could make, given the GPL track length limitations I was forced to accomodate. So just like the real public roads on which the actual MOUNTAIN COURSE is laid out, there are no real run off areas in this GPL version to allow easy recovery from bad mistakes; just hedges, banks, sand bags, stone walls and houses.
The price the real bike riders have paid in the past and still do even today for a bad mistake, is a bent bike and the chance of serious injury or death. There are a number of reminders of this in the place names you see on the road and if you were to visit the Isle of Man, you would see a number of commemorative stones set about the real course.
I really admire the skills and courage of these road racers. They have to put in some quality steady paced practice time to go quickly with safety around here and so will you.
FAST, DANGEROUS DRIVING
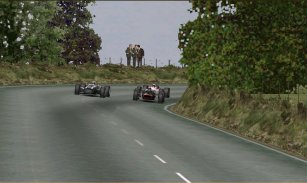
Yet the interesting thing about the Mountain Course is that despite the danger, it flows nicely. It is longer and faster than the Nurburgring, which you can readily tell from the way this GPL track drives and from the historic results and lap records of the real Course [ Official TT Page - See LINKS on the main index page of this site]
It is often a very fast, thrilling drive in 4th and 5th gear, however there are few stetches where you are not turning/twisting to some degree. Most of the 633 track sections that make up this Course are curved!
There are no long periods where you sit at full speed in top gear. Rather you will find that you always need to be thinking about the correct speed and positioning of the car for what lies just ahead. On 8 - 10 occasions per lap you will only just get to full revs or near that in top gear, only to find yourself slowing for the next bend, but thankfully, only twice to a really slow corner.
There are also several spots where you will need to allow the car to transition through bumpy sections on a trailing throttle. Use too much power there are the car will say ' enough' and give up its grip on the road.
To drive the Mountain Course quickly, between 106 and 112 gear changes are required per lap, depending on your gearing [yes I counted them because I was curious about that].
CORNER VARIATIONS
This Course has 198 corners, bends or kinks in the road and like other great road circuits, many of these bends have unique characteristcs. This is not just because of differences in radius and amount of camber, which you will certainly find here, but the cambers are built in two diifferent ways to add variety to the corner entry. Some cambers are made with the outside surface banked up from the general level of the track and others are made with the camber dipping away from the level of the track on the inside of the curve, which creates the slight 'drop down into' effect you get at many of the corners at Silverstone for example.
Adding further interest and complexity is the fact that most corners on the Course are encountered in multiple combinations, or even genuine double tripple or quadruple apexes. Few are stand alone corners. Some go down or up hill, through a dip or over a crest, have a bumpy approach, open out or tighten up on exit, have hidden exits or are confused by tree shadows or road repairs..
LIGHTER GROOVE
The Groove is possibly less distinct here, so it wont help you with line as much as at some other tracks, but it will help you at heavy braking points. This is unusual, so I want to explain why this is so.
There are three reasons.
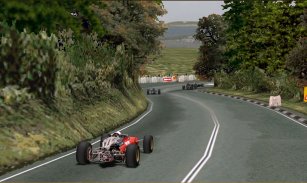
Firstly, the main asphalt texture I have made comes directly from a digital photograph that included a good cross section of typical narrow Isle of Man road in Barregarrow. This has the usual characteristic of a smooth NARROW asphalt road that has been worn even smoother and shinier in strips by cars driving with their right side wheels [ Right Hand Drive Vehicles in UK ] on or about the centreline, unless there is oncoming traffic.
The result is a road surface with only three distinct worn and shinier/lighter strips of asphalt, one in the middle and two at each side of the road where the left wheels run. This is authentic, but it does tend to hide the groove a bit as it transitions over the darker strips of asphalt in each 'lane' and at the road edge, making driving a little more challenging [ read fun ].
Secondly, the basic 'what if' concept for this Course is that the GP Cars get equal 'billing' to the Senior TT [Big Bikes] and the support races are all the other bike/sidecar categories, not other cars. The real races are all bikes. The more a road racing course is raced by bikes rather than cars in any given race week/weekend, the less distinct the groove will be, for these road racing Bike riders just dont put down as much rubber as Cars, or as Bikes would sliding on a shorter circuit.
Thirdly, the longer a course, the fewer practice and race laps are run, meaning far less rubber is laid down than on normal 'short' circuits like Brands Hatch, Oulton Park or Donnington for example..
So for all these reasons I maintain that a heavy groove just wouldn't get laid down on a Course like this.
USE OF 4 BIT TEXTURES
BE A LITTLE CAUTIOUS OF 'ADD ON' / 16 BIT GRAPHICS
I spent a lot of time CONVERTING the asphalt texture and the other dozen or so based on it, FROM 16 bit TO 4 bit to make it look as good and achieve significant frame rate gains for ALL video cards, not just the Voodoo's !.
I feel it is important that you know that 99% of the textures I made for this complicated Course, have been converted FROM 16 bit source material TO 4 bit, to ensure smooth running. That took a lot of time. The only major exceptions being the 16 bit sky/horizon.
Why would I do this? Its like this, the more complicated/intense the close to track scenery is, the more curves there are in the track within the 'Draw Distance' and the faster the cars drive past, the more work your processor and Video card have to do to deal with all that Track File complexity and Texture Memory, for Voodoo OR Geeforce. 16 bit textures have 3 times the texture size of comparably sized 4 bit textures. Your frame rate counter might display 36 fps but you can still get distracting 'stutter' with 16 bit graphics. I defy anyone to pick the difference between well made 4 bit and 16 bit textures unless you have stopped your car on the track!
I have also used a good number of sub images, which in my view and in D3D at least, gives a smooth look. I find that using few subimages works well for tracks with most graphics well away from the driving surface, but can give a speckled/ contrasty and quite distracting look for tracks with lots of close textures. The Isle of Man is an extreme example of this second type of track.
So just be a little cautious; think about authenticity of any 'add ons' that may be made and check your before/after frame rates and for 16 bit 'stutter', ON YOUR SYSTEM/ RASTURISER CHOICE [Open GL/D3D/Glide ] if you are tempted to try some new textures.
Please dont misunderstand me though. Any graphic can be improved and I have nothing against graphic 'addons' for my tracks, provided they are produced/released with sufficient care. That is, they enhance authenticity, are harmonious with the other textures and preserve frame rates hard won by me! If they dont do ALL these things, they are not worth making IMHO
DEFAULT SETUPS
I have spent a lot of time making and testing the DEFAULT SETUPS for all the F1, F2 [ Advanced Trainer ]and F3 [ Basic Trainer ] cars, so that whichever chassis you choose, you will have a well geared, stable, controllable, yet potentially very fast car, tuned to the demands of this Mountain Course.
I have put enough fuel in to complete a 3 lap race.
ONE FINAL WORD OF CAUTION THOUGH!
Tyre Pressures are set so they provide even temperature across the tyres and hence maximum grip, when driving reasonably quickly BUT ONLY AFTER 10 to 15 km INTO YOUR FIRST LAP. THERE WILL BE LESS GRIP UNTIL THEN.
If you want to do only 1 lap at a time, put all the tyre pressures up 1 'tick' ie. 1 LB or the metric equivalent and save that as your "hot Lap" setup.
A.I. BEHAVIOUR
Good A.I. are not important to those who just hotlap or race exclusively on line, but can really make or break the ' immersive' experience for the many of you who like to race against them, provided they;
Are challenging but not too fast.
Try to overtake in appropriate positions and wont just race in single file
Dont always block the middle of the road so that the Player has some chances to pass; and
Are not accident prone.
I set out to achieve all these goals for us.
I drove all the LP laps individually and then manually corrected LP file imperfections that occur where the 'driven' lap is not perfectly smooth [These tend to make the cars hesitate,loose their way completely, or suffer spiked direction changes]
and am now pleased with the results.
Here are the Test Race results for the final A.I. LP files.
NB: Remember these AI are "tuned" to my player speed. My PB when these were done was an 8.19. If you are not as fast as me at first, the A.I. will be slower, when they adjust to your speed.
So these A.I. 'guys' should give you a good, fair racing experience, right up to the full Grand Prix distance. They dice with each other, run side by side on some straights and try to outbrake each other into the slower corners. They pass then get repassed when the passing manouvre takes them off the ideal line. The better AI drivers, when running at the back of the field, will drive through the field progressively, passing where it is safe and logical to do so.
There is a Zip file on my downlods page for those who wish to try a Various combinations of faster, slower and more agressive A.I.
Alternately, you can use Peter O'Connor's GPLAIM program to adjust the speed of the A.I. or their agression.
See the LINKS PAGE on this site.
AQUIRING COURSE KNOWLEDGE AND PRACTICE
Detailed Course knowledge is vital for staying out of trouble here, so you can drive with confidence, enjoy yourself and be consistently quick.
It will take quite some time for you to become really familiar with this 24 km/15 mile Course and develop quick and safe lines over it.
Please be prepared to accept that.
Even though it is faster and with cornering not generally as tight as the Nurburgring, in stark contrast, the "Ring" does have the nice 'safety valve' of a lot of run off for those learning it.
So I suggest there is really no substitute for a fair number of disciplined steady paced practice laps, with good observation of the subtleties of the various corners and their approaches as you go about it.
There are many places where it is unsafe to pass, but many others where you can 'have a go'. These also need to be learned, but I have given you a few clues here.
My advice, for what its worth, is to set aside a reasonable block of time. Dont try to race at first, because it will distract you from aquiring good Course knowledge. Just drive alone in 'Training' mode and take the Course steadily for the first half dozen laps or so. Enjoy your drive in the country and gradually develop some feel for the general "flow" of the place and start identifying some landmarks, before pressing too hard.
Have a look at the Replay included with the track installer, in preference to watching the AI too much. The AI have a simpler physics model than your car in GPL and dont drive the absolute best line here. I made them drive lines that produce interesting racing, rather than ideal but 'blocking' lines.They also have fixed gearing, so dont take any notice of the gears they use or change points.
Also dont forget this Guide and Alan's IOM Trainer [ see downloads page ] if you are having trouvble with particular sections.
Persevere with it and the driving pleasure will come!
GOOD LUCK and HAVE FUN !
JIM PEARSON
July 2003